PROJECT CONTROL · UPDATED SEPTEMBER 17, 2026
Private working record
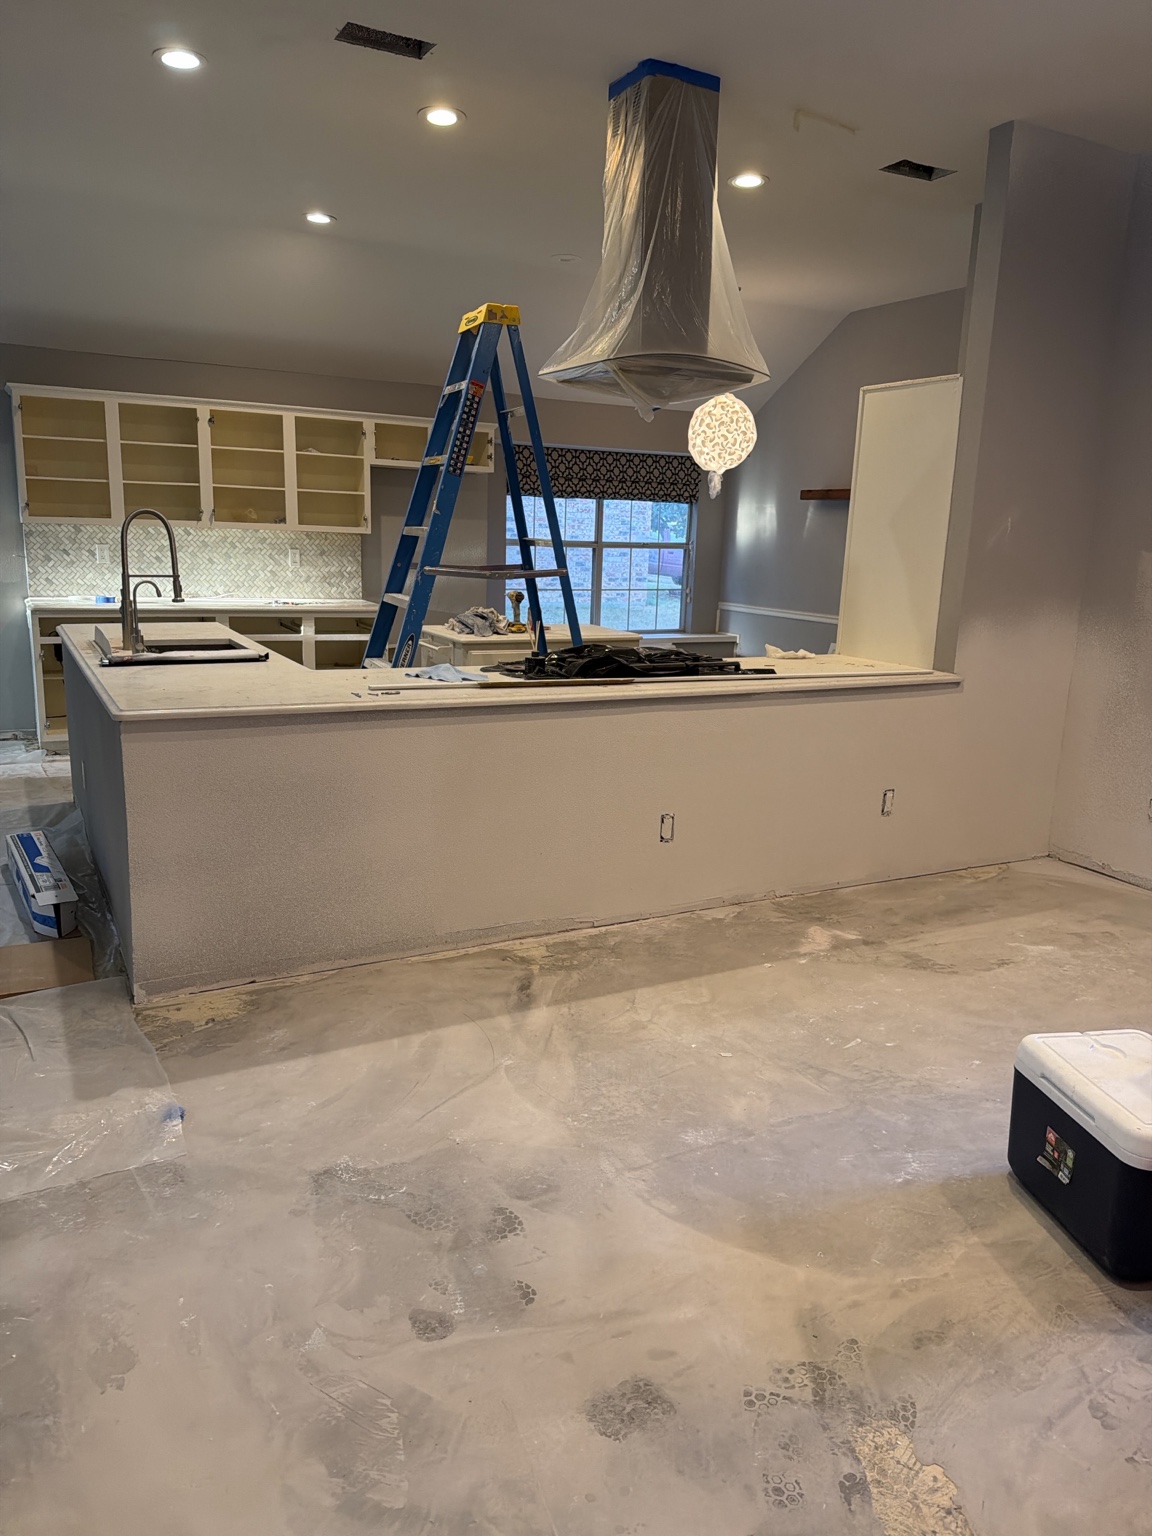
Current field picture
Repairs, decisions, and the fireplace design in one place.
Use this hub to see what is complete, what still needs a field decision, which scopes are ready to price, and what must be verified before work proceeds.
Immediate attention
Next decisions and hold points
MC-001Investigating
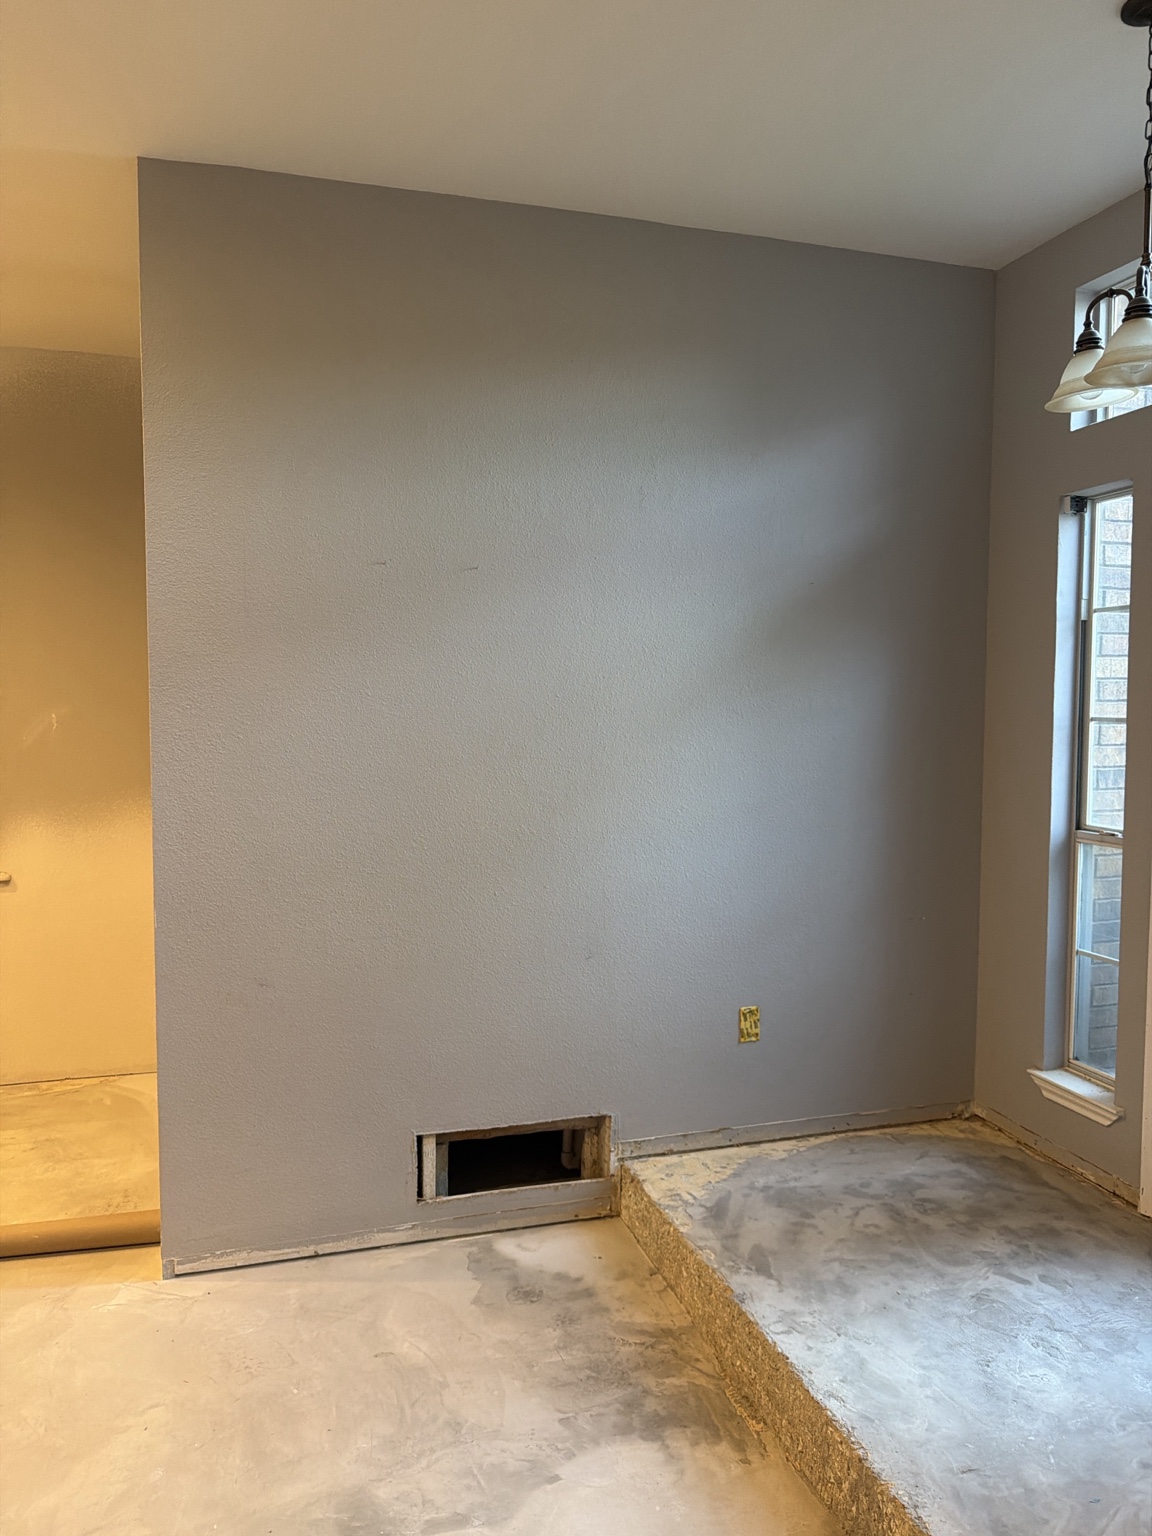
Verify gas shutoff access
Do not drill, cut, or permanently close the marked wall based on photo comparison alone. Confirm the valve and access requirement in the field with the appropriate trade.
MC-005 / 006Decision
Resolve cabinet end and tile line together
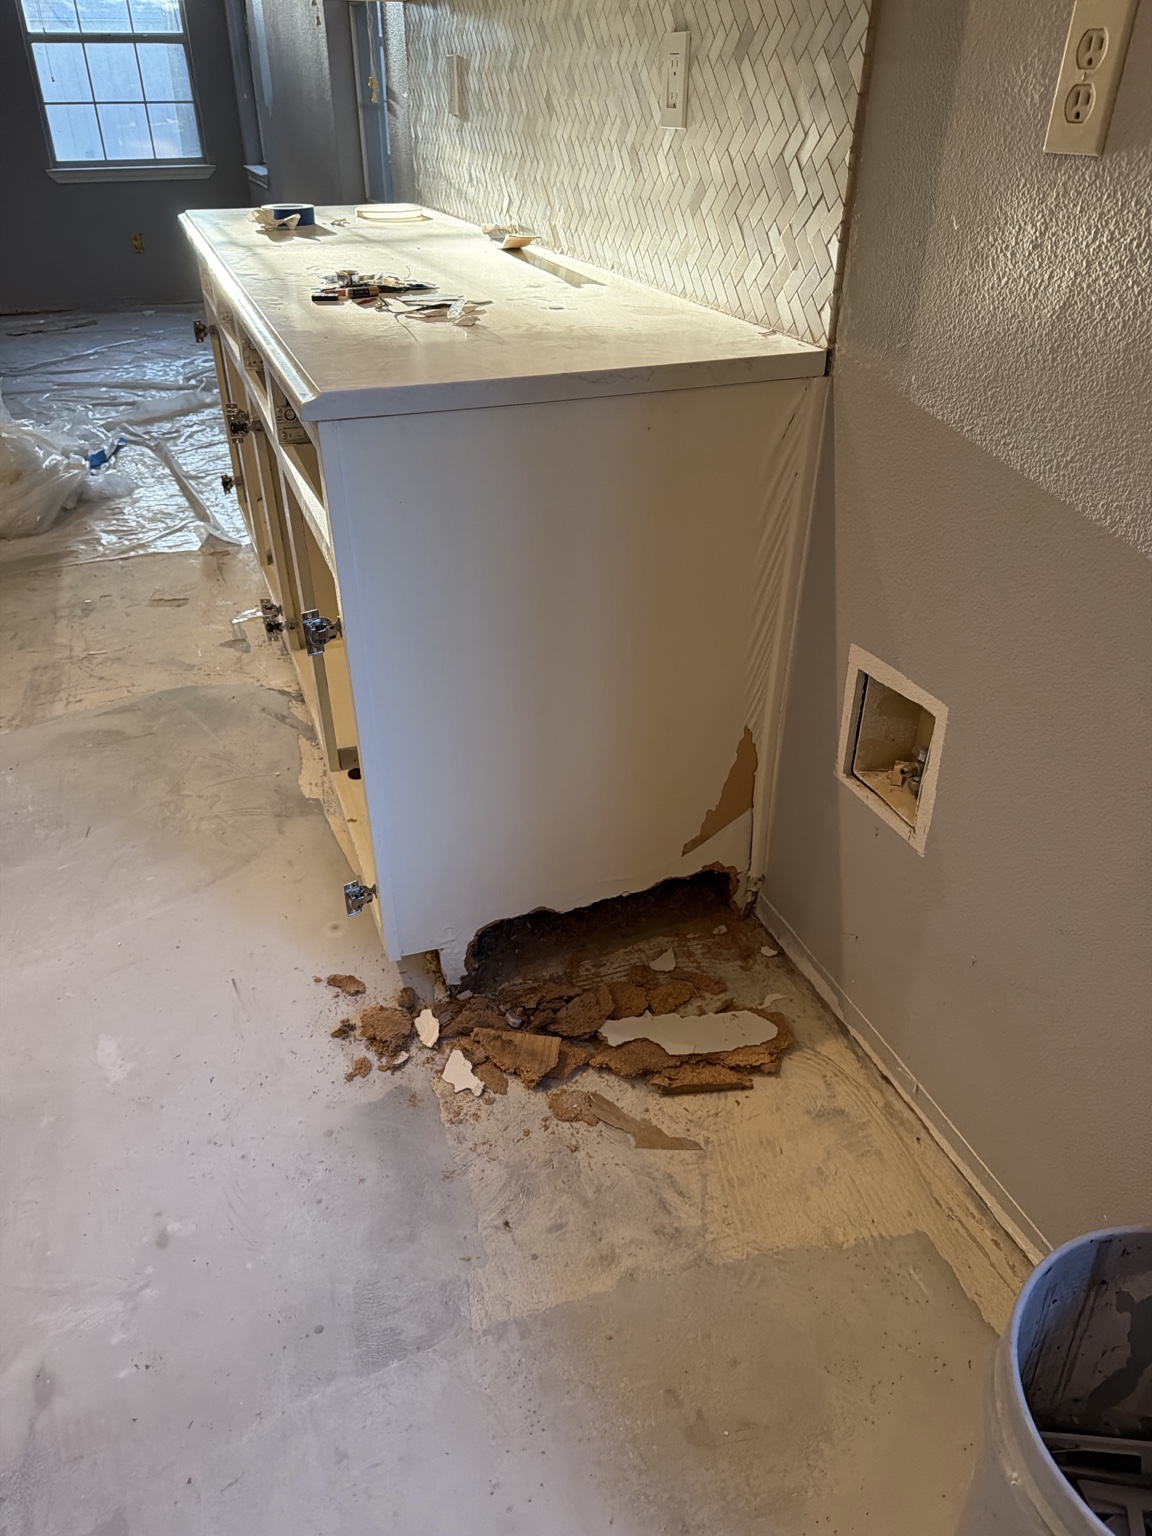
Select a repair assembly for the damaged base-cabinet end before setting the porcelain edge. The cabinet skin/filler can create the plumb datum the backsplash currently lacks.
MC-009Owner selection
Choose fireplace profile
The 4-inch face with an 8-inch exposed shelf provides the strongest balance of usable mantel depth and a lighter wall projection.
Decision register
Questions that still control the work
01
Fireplace profile — 4/4, 6/6, or recommended 4/8?
Owner02
Hearth — no projection, flush inlay, or 8-inch exposed raised slab?
Owner + appliance requirements03
Cabinet end — thin finished skin over sound/block-supported substrate, or full structural end-panel replacement?
Field condition04
Backsplash termination — exact trim orientation, piece count, and continuous vertical datum?
Owner / GC05
Painting responsibility — are primer and finish paint included in the active contract after texture conversion?
GC / painter06
Exterior post repair — lower wrap only or full-height replacement after concealed-post inspection?
Field conditionHomeowner meeting recap · September 17, 2026
One project, two clearly separated work lanes.
The Pitch & Gables lane covers known renovation scope and open coordination. Tangent Forge Field Services is a separate commercial lane for one completed repair and two elective repair estimates.
Pitch & Gables
Known scope and open issues
- Fireplace: design and homeowner feedback; appliance data, clearances, materials, hearth, returns, service access, and final shop detail remain open.
- Base molding: confirm profile, height, thickness, species/material, finish, quantity, lead time, ordering party, delivery, and acclimation.
- Gas valve: safely locate and re-expose required access before finish closeout.
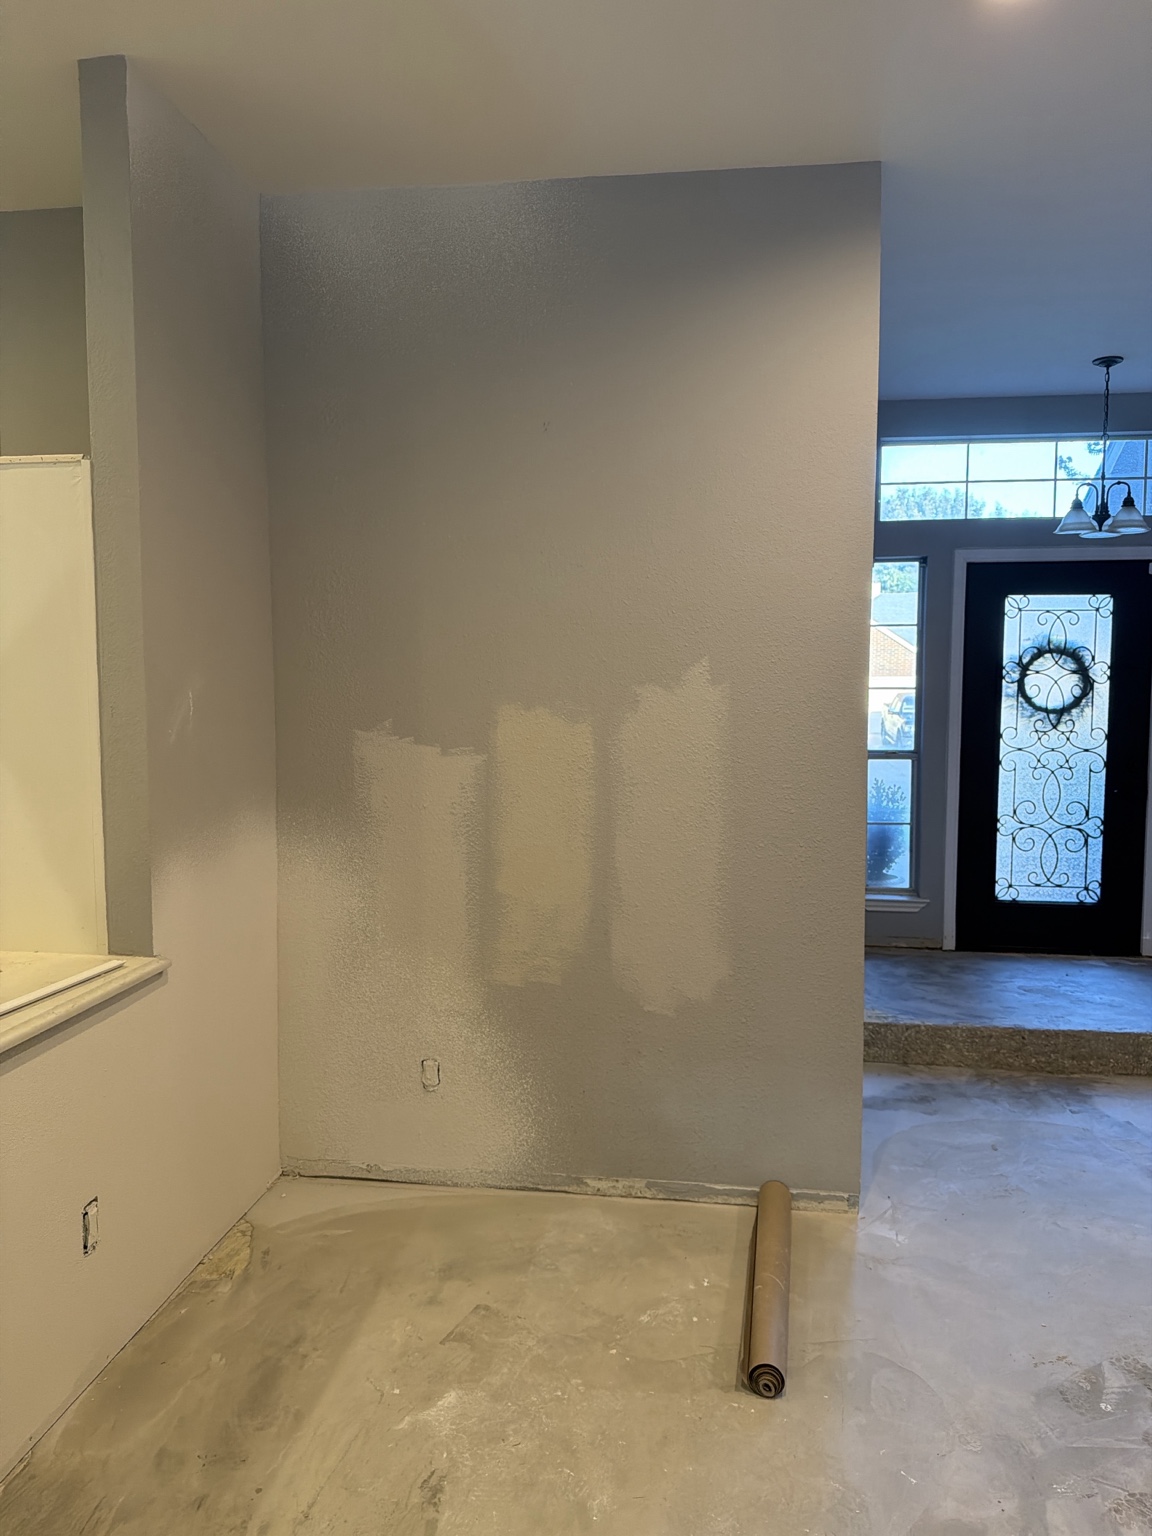
- Back-door wall: repair the small lower drywall area and coordinate texture, primer, paint, baseboard, caulk, and touch-up.
- Wall texture: convert three wall groups—204.16 SF measured / 205 SF bid—from orange peel to a knockdown matching the existing walls.
- Backsplash edging: inventory and dry-fit homeowner-provided porcelain trim, then approve its orientation and terminations before installation.
Tangent Forge Field Services
Independent work and pricing
| Under-sink repair | $625 invoice Complete · due on receipt |
| Base-cabinet end | $425 base $620 with alignment trim; concealed allowance up to $150 only if authorized |
| Exterior post base | $350 one / $550 pair Paint included; upgrades priced separately |
Combined range$1,400–$1,795Includes the $625 completed invoice; excludes allowance and optional post upgrades.
Issues recovered from the existing record
Items discussed beyond the initial list
01
Porcelain backsplash edging — homeowner material still needs inventory, measurement, dry-fit approval, and labor assignment.
Product 101457042 · UPC 88836946388502
One continuous termination line — the cabinet-end repair and backsplash trim must be mocked up together before either is installed.
MC-003 / 005 / 00603
Fireplace sub-decisions — hearth, mantel material, firebox returns, appliance manual/clearances, gas-valve access, and service access remain open.
Owner + GC + qualified trade04
Finish responsibility — assign primer, finish paint, baseboard reinstall, caulk, and touch-up for both drywall and texture work.
Contract clarificationCurrent controlling fireplace measurements
Use these values—not the earlier concept dimensions
| Reference | Current field value | Control note |
|---|---|---|
| Stone face | 64 W × 94 H in | Supersedes the earlier 69½-in / ~95-in concept |
| Firebox opening | 46⅛ W × 26¾ H in | Verify against appliance manufacturer/model and manual |
| Left stone edge to right end of windowsill | 22½ in | Controls visual relationship to the window |
| Finished floor to top of windowsill | 30½ in | Field reference |
| Finished floor to bottom of firebox at stone line | 8¾ in | Lowest stone row has been removed |
| Mantel width | TBD | Recalculate after profile, material, clearances, and 64-in face are confirmed |
Client-ready package
Download the recap and commercial documents
PDF
PROJECT RECAP
↓DOCXHomeowner meeting recap and status
Scope separation, decisions, measurements, sequencing, and photo context.
EDITABLE RECAP
↓PDFHomeowner meeting recap and status
Editable version for revisions, notes, and distribution.
COMMERCIAL PACKAGE
↓DOCXInvoice and repair estimates
$625 completed invoice plus cabinet-end and post-base estimate options.
EDITABLE COMMERCIAL
↓Invoice and repair estimates
Editable version with owner selections and authorization lines.
Living work-item register
Punch list and work tracker
Statuses reflect the information currently documented. Field measurements and trade verification govern where noted.
MC-001Investigating
Gas shutoff-valve location and access
Wall beside stone/fireplace feature
PriorityHigh · safety hold
OwnerQualified gas trade / GC
SequenceBefore finish closeout
EvidenceMeasurements + valve photo
Scope, open questions, and closeout criteria
Required action
- Compare pre-demo photos using at least two fixed landmarks.
- Inspect through an existing opening or with an appropriate scanner/borescope.
- Have a qualified trade identify the valve and line.
- Confirm whether a permanent listed access panel is required.
- Record floor, stone-edge, window-jamb, and electrical-box offsets.
Hold point
Do not drill, saw, or open the wall at the red X solely from the mark or photo comparison. Concealed gas piping and wiring may be present.
Close when
Location, access disposition, measurements, verifier, and before/after photos are recorded.
MC-002Open
Drywall repair beside back door
Lower wall immediately left of door casing
PriorityBefore baseboard / paint
OwnerTBD
Field verifyPatch size + drywall thickness
DependencyArea dry and sound
Scope, questions, and acceptance
Working scope
- Protect casing, floor, and adjacent finish.
- Remove loose material to firm edges and inspect framing/bottom plate.
- Resolve moisture, decay, or pest damage before closure.
- Add backing; install matching drywall; tape, finish, and blend texture.
- Prime, coordinate finish paint, reinstall baseboard, caulk, and clean.
Open questions
- Cause of damage?
- Does casing need to be loosened?
- Who owns texture, paint, and baseboard?
Accept when
Patch is secure, flush, blended, dry, primed, and photographed with casing undamaged.
MC-003Open
Install homeowner-provided backsplash edging
Exposed vertical tile termination(s)
MaterialHomeowner supplied
Label / UPC101457042 / 888369463885
VerifyRuns, count, profile, fit
ApprovalDry-fit before install
Installation scope and hold points
Working scope
- Inventory pieces and measure every intended edge.
- Dry-fit orientation, projection, joints, and top/bottom terminations.
- Protect adjacent finishes and prepare a sound bond surface.
- Install plumb with compatible setting material and consistent joints.
- Grout approved joints; use flexible sealant at changes of plane.
- Clean, protect through cure, and return unused pieces.
Do not install until
The continuous cabinet/backsplash datum in MC-006 is resolved and the homeowner/GC approves the dry-fit appearance.
Accept when
All approved exposed edges are covered, straight, chip-free, clean, and photographed.
MC-004Complete
Under-sink cabinet base replacement
36-inch sink base · interior panel 34½ × 23½ inches
LaborLess than 5 hours
Core materials$78.39
Invoice$625 fixed price
Job recordTF-CRE-2026-001
Completion record and billing basis
Completed scope
Deteriorated base removed; support rebuilt; fitted plywood floor, trim, and perimeter sealant installed; removable center member restored; disposal and water-treatment equipment remained in service position.
Verified panel: 34.5 × 23.5 in = 5.63 SF. Receipt documents a ½-in × 2-ft × 4-ft sanded birch panel.
Billing record
Recommended customer invoice: one $625 lump-sum residential repair through Tangent Forge, LLC. Sales tax shown as $0; tax paid on purchased materials.
Download estimate-to-invoice package →MC-005Owner selection
Base-cabinet end panel and toe-kick return
Independent Tangent Forge Field Services estimate
Base repair$425
With alignment trim$620 recommended
Concealed allowanceUp to $150 if authorized
CoordinateMC-003 and MC-006
Repair options and acceptance
A · preferred if sound
Overlay / skin repair
Remove all loose particleboard; install dry, secure blocking at the lower edge; apply a 3⁄16–¼-inch paint-grade or finished cabinet skin over the full visible end; return neatly into the toe kick.
B · if structural damage extends
Full end-panel replacement
Remove the damaged end assembly, support the counter and cabinet as required, and install a new ¾-inch panel with a reconstructed toe-kick return. Use when the remaining substrate cannot reliably hold the skin.
Field verify
- Moisture source is inactive and substrate is dry.
- Extent of damage behind the removed lower section.
- Countertop/cabinet load path and attachment.
- Exact skin thickness and effect on adjacent clearances.
Accept when
End is flat, plumb, firmly backed, free of loose particleboard, aligned with the intended backsplash termination, and ready for the assigned finish.
MC-006Layout decision
Continuous cabinet-to-backsplash finish line
Right end of countertop and backsplash
ProblemUpper and lower edges do not align
Design datumOne plumb finish line
IntegrationCabinet skin + porcelain trim
ApprovalFull-height mockup
Recommended coordinated detail
Recommended approach
- Measure the horizontal offset between the lower cabinet/counter edge and the upper backsplash termination.
- Use the new full-height cabinet end skin or a purpose-made painted filler/return to establish one intentional plumb plane.
- Terminate the backsplash at that plane and install the porcelain edge against it.
- Keep the vertical line continuous from counter to the top of the backsplash.
- Use a flexible sealant joint where dissimilar materials meet.
Avoid
- A short trim piece that follows the tile but dies into a visibly offset cabinet end.
- Multiple stepped lines created by treating the cabinet, counter, and tile independently.
- Cutting or setting trim before the end-panel repair thickness is known.
MC-007Owner selection
Exterior post-wrap bottom repair
Independent Tangent Forge Field Services estimate
One damaged base$350
Both matching bases$550 recommended if profile changes
Optional bevel+$25
Top cap+$45–75 + material
Working scope and change trigger
Working scope
- Protect adjacent paving/finish and remove the failed lower wrap.
- Probe and photograph the concealed structural post and backing.
- Correct water-entry/detailing issues within the approved finish scope.
- Install compatible backing and replacement wrap, maintaining a drainage/clearance detail at the bottom.
- Seal joints, prime cut ends if wood is used, and coordinate finish paint.
Change trigger
Stop and obtain approval if the structural post, anchorage, or concealed framing is decayed, corroded, or unstable. Final price depends on post dimensions, repair height, material, and hidden condition.
MC-008Ready for pricing
Orange-peel to knockdown texture conversion
Three measured wall groups
Measured204.16 SF
Bid quantity205 SF
Planning quantity225 SF incl. allowance
Maximum height120 inches
Measured areas and bid scope
Wall areas
| Stepped wall: 54 × 120 + 51 × 113 | 85.02 SF |
| Straight wall: 72 × 120 | 60.00 SF |
| L-wall: 29.5 × 120 + 132 × 34.5 + 5 × 84.5 | 59.14 SF |
| Total | 204.16 SF |
|---|
Base bid
Field verification, protection, clean/scuff/degloss, skim-coat surface reset, approved knockdown sample, uniform application, correction, cleanup, and ready-for-primer condition.
Download painter request-for-bid →MC-010Selection required
Base molding selection and procurement
Pitch & Gables known scope · homeowner requested process
SelectProfile, height, thickness
SpecifyMaterial + finish
QuantifyLF + waste + lead time
AssignOrdering, delivery, storage
Selection and procurement sequence
- Photograph and measure the existing molding to be matched.
- Approve a physical sample with the homeowner.
- Confirm room-by-room linear footage, waste factor, availability, and lead time.
- Document who purchases, receives, inspects, and stores the material.
- Deliver early enough for inspection and acclimation before installation.
Close when
The approved sample, manufacturer/profile, dimensions, material, finish, quantity, purchaser, delivery date, and storage plan are recorded.
MC-009Design decision
Fireplace surround, mantel, and hearth design
Homeowner design selection and construction verification
Recommended baseline4-in face / 8-in shelf
Stone face64 W × 94 H in
Firebox opening46⅛ W × 26¾ H in
Mantel widthTBD after verification
Decision sequence
- Identify appliance model and exact clearance diagram.
- Choose one of the three profile options.
- Select hearth: none, flush, or raised.
- Select mantel and firebox-return materials.
- Field-measure and issue shop detail showing build-up and anchors.
No work items match
Clear the search or select another status.
Scope and document center
Ready-to-use project records
Open the source packages for pricing, invoicing, and field coordination. The project tracker below consolidates the active record; the files preserve the detailed source documents.
PDF
CURRENT PROJECT RECAP
↓
PDFHomeowner meeting recap and status
The controlling split between Pitch & Gables coordination and independent Field Services work.
CURRENT COMMERCIAL PACKAGE
↓
DOCXInvoice and repair estimates
Completed under-sink invoice and owner-selectable cabinet-end and post-base estimates.
COMPLETED REPAIR
↓
DOCXUnder-sink estimate-to-invoice package
Measured scope, receipts, completion record, billing decision, invoice draft, and reusable pricing workflow.
REQUEST FOR BID
↓
MDTexture conversion takeoff
204.16 SF measured, 205 SF bid quantity, preparation scope, contractor clarifications, and photo references.
SOURCE RECORD
↓
MDProject work tracker
Original detailed entries for gas-valve verification, back-door drywall, and homeowner-provided tile edging.
FIELD NOTEBOOK
↓
SITEProject notebook
Photo review, safety hold point, measurement log, decisions, activity log, and closeout evidence structure.
PRIOR CONCEPT STUDY
↗
Original fireplace visual study
Previous visual comparison, conceptual renderings, and the first 4-inch-face / 8-inch-shelf recommendation.
Measured scope summary
Known quantities and commercial records
| Scope | Quantity / basis | Status | Commercial note |
|---|---|---|---|
| Under-sink cabinet base | 34½ × 23½ in · 5.63 SF | Complete | $625 lump-sum invoice recommended |
| Texture conversion | 204.16 SF measured · 205 SF bid | Ready | Painter to confirm primer / finish-paint responsibility |
| Cabinet end / toe-kick | Field measure full visible end and lower damage | Estimate | $425 base · $620 with alignment trim · allowance only if authorized |
| Porcelain backsplash trim | Linear feet and piece count TBD | Open | Homeowner material; labor authorization still required |
| Exterior post wrap | One damaged base or both matching bases | Estimate | $350 one · $550 pair · optional upgrades separate |
| Fireplace surround | 64 W × 94 H in face · 46⅛ W × 26¾ H in firebox opening | Design | Mantel width and shop detail follow appliance/material verification |
Photo record
Available project context
HOMEOWNER DESIGN PROPOSAL · REVISION 2
A useful mantel without making the fireplace wall unnecessarily heavy.
The gas firebox remains at its current wall plane. The three options below separate two dimensions: how far the finished stone face moves forward, and how much usable mantel shelf extends beyond that face.
RECOMMENDED BASELINE4in + 8in
4-inch finished face projection
8-inch exposed shelf
12-inch total mantel depth
01
One measurement rule
Face projection + exposed shelf = total mantel depth
All depths start at the original wall plane. This avoids calling an 8-inch shelf “8 inches deep” when its actual overall depth is 12 inches.
4″ face+8″ shelf=12″ overall
Profile comparison
Three buildable design directions
OPTION A · COMPACT 1:1
4-inch face + 4-inch shelf
8″ total depth4″ usable shelfLightest projection
Best when preserving floor/room depth matters most. Visually balanced, but the 4-inch shelf will read more like a ledge and offers limited usable display space.
OPTION B · DEEP 1:1
6-inch face + 6-inch shelf
12″ total depth6″ usable shelfHeaviest wall mass
Creates a substantial, traditional feature and a moderately useful shelf. The six-inch face build-out adds the most wall bulk without providing more overall mantel depth than Option C.
OPTION C · SHELF-FORWARD
4-inch face + 8-inch shelf
12″ total depth8″ usable shelfBest proportion
Keeps the stone face relatively light while providing the deepest usable shelf. The shelf is nearly twice the mantel thickness, so it reads as a functional slab rather than a square beam.
Selection matrix
What changes between the options
| Design factor | 4 + 4 | 6 + 6 | 4 + 8 · recommended |
|---|---|---|---|
| Finished face projection | 4 in | 6 in | 4 in |
| Exposed shelf beyond face | 4 in | 6 in | 8 in |
| Total mantel depth from original wall | 8 in | 12 in | 11½–12 in |
| Suggested thickness | 4–4½ in | 4–4½ in | 4–4½ in |
| Visual character | Compact, shallow, clean | Substantial, heavier, traditional | Light wall, useful shelf, refined |
| Practical shelf use | Limited | Moderate | Best |
| Room encroachment | Least | Most at full face | Same outer edge as 6 + 6; less face mass |
Front elevation
Recommended working proportions
Conceptual—not to scale. Firebox opening, mantel elevation, ceiling return, and clearances remain field/manual controlled.
Working dimension schedule
- Stone-face width
- 64 in
- Wall height at face
- 94 in
- Firebox opening
- 46⅛ W × 26¾ H in
- Floor to firebox bottom
- 8¾ in
- Floor to windowsill top
- 30½ in
- Stone edge to sill end
- 22½ in
- Recommended face projection
- 4 in baseline
- Recommended exposed shelf
- 7½–8 in baseline
- Mantel width
- TBD after verification
Current control
These field values supersede the earlier 69½-in face, ~95-in wall, and 78–80-in mantel concept. Recalculate the mantel after appliance clearances, profile, and material are confirmed.
Base treatment
Hearth options
No projecting hearth
Cleanest and most contemporary. Preserves floor area, avoids a dust/trip ledge, and keeps the tall face visually light.
Best with: Option C when the appliance manual permits it.Flush inlaid slab
Defines a noncombustible floor zone without adding a raised projection. Requires careful coordination with final flooring and appliance requirements.
Best with: a minimal, integrated floor detail.8-inch exposed raised slab
A 2–3-inch-thick slab aligned with the mantel ends creates a grounded, more traditional composition and is closest to the inspiration direction.
Best with: sufficient walking clearance and a deliberate symmetrical base.Finish strategy
Details that will make or break the result
Face veneer
Use light marble or quartzite thin stacked stone with consistent horizontal courses. Keep small rough pieces on broad face areas.
Mantel slab
Use honed natural stone, cast stone, porcelain, or another verified heat-suitable noncombustible assembly. Confirm resin limits before using engineered quartz.
Firebox returns
Use smooth honed slab or manufacturer-approved matte-black metal. Avoid tiny rough veneer cuts around the appliance frame.
Outside corners
Use purpose-made corner pieces or clean slab returns so mesh, thinset, and cut veneer edges never remain visible.
Ceiling return
Keep the front termination level, then provide a small finished top return as the ceiling rises outward into the room.
Hidden support
Anchor the mantel into structural framing or concealed steel designed for the weight and projection—never rely on veneer for support.
Before construction
The fireplace listing controls the final detail.
This proposal establishes design intent, not appliance clearances or a permit/fabrication drawing.
- 01
Photograph the rating plate; record manufacturer and model.
- 02
Retrieve the exact installation manual and mantel-clearance chart.
- 03
Confirm allowable facing overlap, noncombustible zones, hearth requirement, and mantel height.
- 04
Preserve glass removal, louvers, convection gaps, lower service access, and gas-valve access.
- 05
Field-measure the firebox, wall, windows, ceiling intersection, and walking clearance.
- 06
Issue a shop detail with substrate build-up, blocking, brackets, joints, returns, and accessible utilities.
Owner selection record
Decisions required to advance the fireplace
Profile: □ 4 + 4 □ 6 + 6 □ 4 + 8 recommended
Hearth: □ none □ flush □ 8-in exposed raised
Return: □ honed matching stone □ approved matte-black metal
Mantel material: __________________________________________
Approved by / date: ________________________________________